Knitting patterns tell you how to knit the pattern and the shape for the garment you want. Many commercially available patterns are written out row by row using shorthand and abbreviations. You will soon get to know how to read these. The alternative, which is often used in knitting magazines to save space, is to use charts to pictorially represent the pattern stitches. In my opinion charts are more useful to the experienced knitter who is able to translate the images into actual knitting.
Row by row patterns use abbreviations and the common ones you will come across are k – knit, p – purl, k2tog – knit 2 together. Where the pattern calls for special stitch patterns such as C6B these will be explained in the abbreviation section of the pattern. Be sure to read these carefully through as there is no single standard for abbreviations.
Tip: Look through the pattern before you begin and check you understand what you are going to be doing.
Common shorthand phrases in knitting patterns
Cont as set
Continue to work as previously stated. This would be used where you had knitted several rows of pattern and have reached the pattern repeat. Rather than rewrite the instructions over and over, the phrase cont as set tells you to continue in pattern as set.
For example: Row1 k Row2 p.Cont in st. st. as set.
This means knit the first row, purl the second row then continue knitting in stocking stitch (stockinette) as set.
Keeping patt correct
Continue working the stitch pattern correctly over the correct number of stitches while doing something else that may interfere with the pattern, usually shaping. For example, if you are knitting an Aran pattern with a moss stitch (seed stitch) at the edges, when you decrease for the armholes the moss stitch pattern section will be shortened but you must continue to keep the pattern correct as you move across and into the cable design section.
At the same time
This is where you will need to do two things at the same time so keep your wits about you. An example would be decreasing on a cardigan front at the neck edge and the armhole edge at the same time.
Work straight until
Continue to knit the work without any decreasing or increasing. Usually this is until a particular length is reached.
Work as given for
With garments the front and back are often very similar so to avoid rewriting all the instructions the pattern will state ‘work as given for back until’ and then there is usually a mark made of asterisks (***) or it may be ‘work as given for back until’ a particular length is reached.
Reverse all shaping
The left hand side and the right hand side of a garment are usually mirror images of each other. In the pattern the shaping for the first side will have been written out in full and the other side must be worked to be a mirror image of it. For example, the two fronts of a cardigan will be mirror images of each other.
Repeat from * to *
This is where a small number of stitches have been described setting a pattern. That set (between to *s) should be repeated right across the row. e.g. *k2,p5,k3,p2* repeat from * to *
Sizes
Knitting patterns usually accommodate several different sizes. The instructions are presented in brackets with the smallest size outside of the brackets and the larger sizes inside.
For example: 32[34:36:38]. Usually the brackets are square brackets and the numbers are separated by colons but I have seen patterns with round brackets and the numbers separated by commas: 32(34, 36, 38).
Once you have decided which size you are knitting you will always find your instructions in the same position within the brackets. That is the smallest size will always be outside the brackets, the second size will always be the first inside the brackets and so on.
Examples of instructions:
- Cast on 100[106:112:118] stitches
- Repeat pattern 2[2:3:3] times
- Dec 2[0:2:4] sts. If your size states 0 then do not work that instruction at all. Where only one figure appears then it refers to all sizes.
You can find our guide on how to decrease and the different techniques here.
Reading a stitch chart
A stitch chart will tell you how to create a particular pattern. This is done through a series of symbols. Imagine you are looking at the front of the piece of work, each symbol on the chart represents the stitch as it appears on the knitting. Each square represents one stitch on your needles.
The chart is then read from the bottom right hand corner. Right side rows are read from right to left and wrong side rows from left to right. And the symbols for knits and purls are reversed between right and wrong side rows. A dot or dash in a square indicates a purl on the right side and a knit on the wrong side.
A blank square represents a knit on the right side and a purl on the wrong side. Once you are confident with your knitting you will find charts can be very helpful. For example, if you want to create your own design instead of the one detailed in the knitting pattern you could combine different charts for different stitch patterns from one of the excellent stitch collection books that are available.
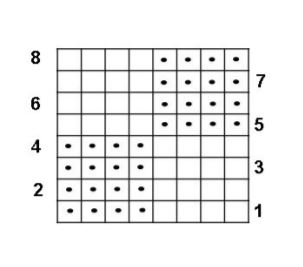
Key: Squares with a dot: purl on right side, knit on wrong side. Squares without a dot: knit on right side, purl on wrong side
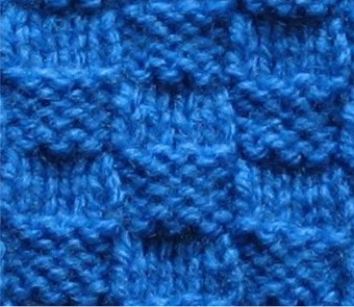
This chart is for a four stitch check textured design.